The fixing and decorating continue to creep along here at the house. While I’d certainly love for my fairy godmother to appear with a bag of money so we could finish it all at once, the slow pace means we’re appreciating each little improvement as it comes. And finally, 6 months into living here, we have one room far enough along that we’re excited to show you guys what it looks like! So we bring you: a blow-by-blow of the dining room!
First, let’s go back to the way it was when we first looked at the house. Here’s the official photo of the room from the real estate listing:
We had to re-do the room from top to bottom, not just decoratively but structurally as well. You might recall one of our early posts when we discovered that the one wall (where the low side table is on the right in the above photo) had some major water damage inside and a section of it had to be rebuilt:
Ahhhhhh, much better.
Then there was the old, wrinkled, rotten carpet. That was one of the first things to go.
All sliced up and ready for the dumpster!
And a section of the ceiling had to be replaced as well — again, water damage that hadn’t been addressed by the previous owners.
Once the wall and ceiling were fixed and the carpet replaced, we could focus on the actual look of the room.
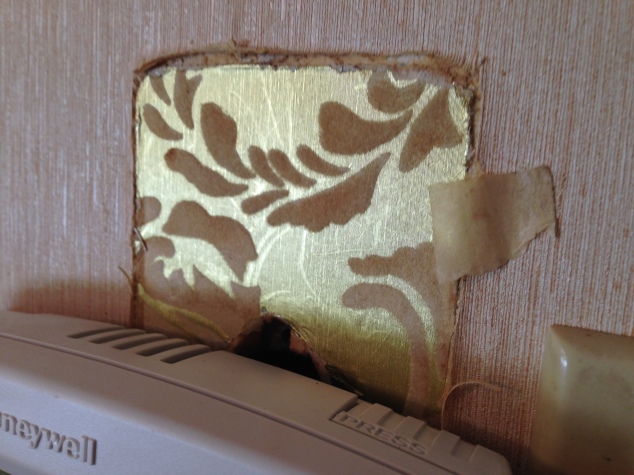
You might recall from a post a few months ago, that we decided to go with a metallic wallpaper for the walls. When we were fixing the wall with the water damage, we discovered a little patch of the original wallpaper under the thermostat… and given that it was a wacky gold metallic flocked pattern, we wanted to make a nod to the original without being *quite* so wacky.
The original swatch:
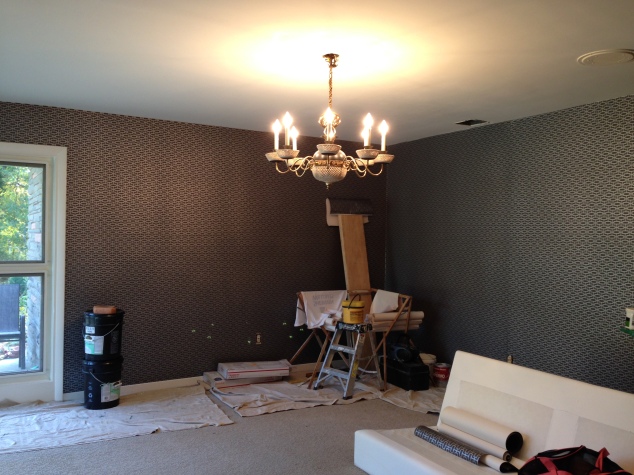
So, we found a lovely gray and pewter pattern that was a bit shiny, but also more modern and elegant. And we had our paper hanger friend put it up sideways, so that the pattern in the paper matched the shoji pattern in some of the woodwork throughout the house.
A close-up of the paper…
…and just after it was put up. Yay!
Furniture-wise, we had no dining room furniture or other decor to put in the room. But we were lucky enough to find what we needed over time, with the help of auctions, furniture sales, and friends.
We found the table and chairs set first, so at least we had a place to eat. 😛 And we were so in love with the acid yellow/green fabric on the chairs, because it really stands out against the gray wallpaper.
Then a couple of weekends ago, our awesome friend Maureen gave us a deal on a vintage credenza she was looking to get rid of. It needed some sprucing up, but of course that meant that Jack got to go nuts with some Simichrome and tinted furniture oil, so he was a happy camper!
Oiling up the dings and scratches in the wood…
The drawer handles before — tarnished up from years of love and use…
 The handles removed for easy polishing…
And now we play “guess which one has just been polished”! 🙂
Back on the credenza, good as (almost) new!
The credenza was the last big piece we needed to make the room feel like a dining room. It gave us space to store our table linens, as well as some of our little tabletop decor… and so with a big mirror and a few other touches, we’re just about finished!
*drumroll* and… voilá!
We’re so happy with how it turned out so far. There are still some things we need to do to the room eventually, like remake the pinch-pleat drapes (had to throw them out due to the cigarette smoke damage) and eventually replace the light fixture… but for now, it’s exactly what we wanted and makes it feel much more like home. 🙂


Gorgeous!
LikeLiked by 1 person
Wow! What a transformation! It definitely fits the “MCM in the 21st century” bill. Well done.
LikeLiked by 1 person
Thank you! The rest of the house is so much of a time capsule, we’re trying to have a little hint of today-modern here and there to balance it out. 🙂
LikeLike
EEEEEE love it
LikeLiked by 1 person
So lovely! I can see family around the table at holiday time. Enjoy!
LikeLike
What a lot of work, but SO worth it in the end! Magnificent job!
We’re so impressed with all that you’re accomplishing with this house!
LikeLike